Wednesday, February 17, 2016

Timeout for toys.

It turns out I serviced another interrupt from the zipit gps around the same time as the burgerspace work -- another case of idle hands getting into things.  I got the urge to check out the latest postings in the ldraw.org forum.  I haven't done anything there in years, but every so often I like to visit and see what's new.   How did it happen this time?  Well, for some reason the movie Frozen really appeals to my wife.  I don't get it myself, but I do like legos and they introduced some new lego sets this Christmas featuring characters and scenes from the Frozen movie.  So I got them for us to work on together.  As it turned out, we were assembling the sets around the same time I was working on burgerspace.  This turned out to be excellent timing, and I'll get to why in just a bit.

Anyhow, building with legos always makes me think about LDRAW, and so I paid a visit to the ldraw.org forum.  There were all sorts of new projects under development there, but one in particular caught my eye.  LPub3D is a new version of LPub that appears to incorporate leocad into the right side panel, I assume to assist in positioning the lego models live, as you're preparing the building instructions for publishing.  The latest release announcement mentioned some updates to the ldglite code, which is used as the quick and dirty low end rendering option.

What's that?  New ldglite code?  And there were bug reports too, complaining about the ldglite image quality and inaccuracies compared to LDView.  Wow.  My ldglite sourceforge repository's been mostly inactive for like 4 years now.  I had to get involved in this before people lost interest and moved on.  Sorry zipit gps, we'll get back to you later...

So I requested a copy of the ldglite code updates, dug an old pentium 3 Windows laptop out of cold storage (the garbage) and got to work installing ldraw programs and reconnecting with my sourceforge archives.  The new code adds support for more ldraw search directories, where I'd fallen far behind in support of the current LDRAW standards.  So I merged it into the CVS repository.  The new stuff pulls in some C++ code from LPub3D and adds it to the l3 parsing code, so I ended up splitting the l3 code into a C version and a C++ version  That way I can still build things with just my C compiler.  Eventually I'll try to duplicate the directory search code in C because I want it too.

Then I got to work on the bug reports.  I tried to duplicate some of the problems in LPub3D with the car.dat example model that comes free with the part files.  Here's what I did. 

First open the example car.dat model and go to the last step (step 8):
Then configure the preferred renderer in lpub3d preferences to LDView.
Do an alt-printscreen and paste into an mspaint window.

LDView looks pretty good.

Repeat configured for ldglite rendering and paste into the same mspaint window.
Then toggle back and forth with control-Z and control-Y to see the differences.
Ldglite is clearly the low quality image winner.  Darn it.

It looks like the same viewing angle, but the ldglite part images are slightly bigger.  The size difference is quite subtle.  It could be just different edge line width options, but I suspect it's a little more than that.

Now take a look at Step 3 of the instructions.  This shows how subtle differences in the part images can lead to a different layout of the parts inset box.
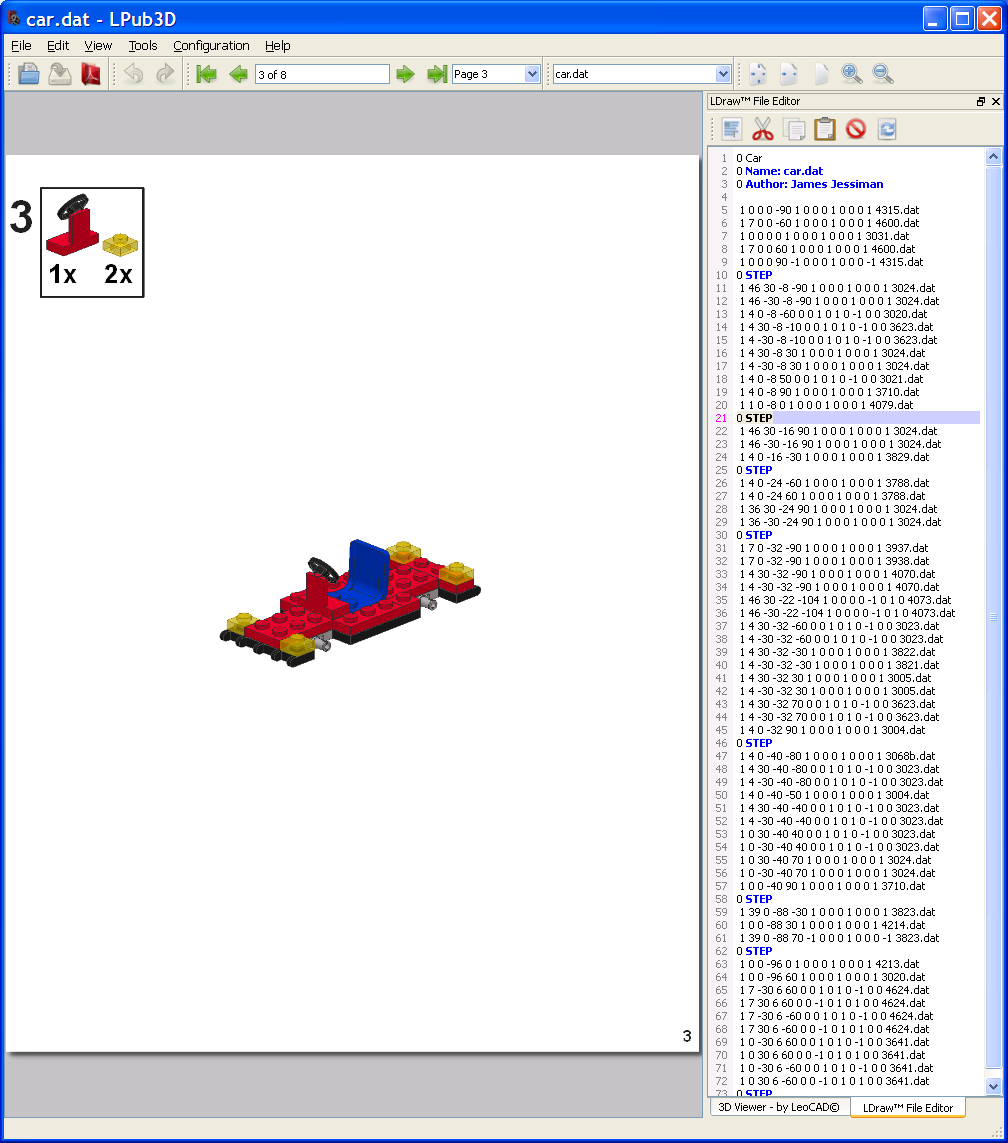
Here's step 3 using LDView.

 
And here's step 3 with ldglite.  The parts inset box is different.

You might have noticed the lighting is also different.  Both LDView and ldglite have some ambient light and a spotlight, but ldglite defaults to placing the spotlight at (x,y,z) = (-1000,1000,1000), probably for compatibility with the original LDRAW.EXE program, or the old LDLite.exe viewer.  The default places the spotlight above the viewer and off to the left.  Adding -lc0,1000,1000 on the command line makes it more like LDView default lighting which is above and directly behind the viewer.  But I didn't see anywhere that I could set this in LPub3D.  I thought I remembered a place in the old LPub for extra settings, once upon a time.  That'd make it much easier to test things.

Meanwhile, I could see where LPub3D keeps its work in the ldraw models directory.  It'd be nice if it had a debug setting to keep a running log there with all of the commands it sends to the external rendering programs.  However, the source code patch came with an example ldglite command line, so at least I had that to work with.  For rendering, LPpub3D spins the parts (or the model) before calling ldglite with command line settings to view it from really far away with a small view angle in order to simulate an orthographic view with a perspective view matrix.  My notes in the ldglite code suggest this is because the POV ray tracer doesn't, or didn't, support orthographic projections.  LDView might not either.  Examining the render.cpp code in LPub3D appears to confirm this.

Anyhow, I made a model with just one red 4x4 plate to see what differences other than the light source I could spot between LDView and ldglite.

The plate in LDView


The plate in ldglite
The plate in l3p/POV

I pasted the LDView red plate image over the ldglite image and zoomed in.

I think it's pretty clear that ldglite is being told to render on a white background with thicker anti-aliased edge lines.  You can't readily tell if it's a transparent png in mspaint, but viewing them here shows both images have transparency enabled for the background.  The edge line widths could add up to a pixel or 3 difference in size, but we see more than that, and it's proportional to the shape of the box, so it's a slightly different view.  It could simply be that ldglite uses the origin point (0,0,0) in the model as the look at point and LDView looks towards the center of the bounding sphere.   I'll have to experiment with this to get a better match in the generated images.

For now, I attempted to fix some of the easy stuff.  And this is where burgerspace plays a part.  The readme.txt file for ldglite tells how to scale up by 2 and dump an image that can be post processed by another program to downsample with antialiasing for a more pleasing appearance.  Once upon a time the ldraw parts tracker did just that.  But fresh from my success with burgerspace, I figured I had everything I needed to add a simple average and decimate by 2 output filter right into the ldglite code.  So I did, and ran it through LPub3D -- with hard coded ldglite settings for now -- to see how it stacked up.  It's still not LDView quality, but I think it's a vast improvement.  Perhaps medium-low quality.

Here's step 8 with the 2x AA Filter in ldglite.  I also moved the light source.


Here's step 3 in the improved ldglite.  The inset is more like LDView now.


Not too shabby.  The code is in CVS on the sourceforge, but needs some cleanup.  I'm thinking of trying a Gaussian blur filter, possibly with gamma correction, and maybe 3x oversampling and decimation.  Why not?


Meanwhile I did some math on the look at point and I don't see how it makes much of a difference if the origin is on the corner of the plate or in the center at the great distance we're viewing from.  Here's the setup used by LPub3d.  What is that, one light year off in the Z direction?

        -ca0.01 -cg0.0,0.0,3116890

The camera viewing (FOV?) angle is a teensy 0.01 (degrees?) so a tiny change to that number might be enough to create the difference in the plate images.  Perhaps I'm using floats instead of double precision somewhere, leading to larger noticable errors in the calculations.  More investigation is needed.  I hope LDView keeps a log of the commands it executes.   Then I can experiment directly in ldglite and LDView without even loading LPub3D.  That'd make this whole process go more quickly.

Anyhow, after looking at the inconsistent treatment of edge lines that fell evenly on the 2x2 pixel samples versus the ones that straddled the 2x2s, I decided the gaussian blur filter was a must.  The quick and dirty 2x2 was good enough for burgerspace, but this is important.  Appearance actually counts.   So I coded it up and replaced the 2x2 filter.

Here's a 2x scaled image of the car (-S2 -w1).  No downsampling, plenty of jaggies. 


Here's the same car scaled up by 4 (-s4 -w2), then decimated by 2 with the blur filter.

Overall the quality of the blur filtered image is better, and more consistent around the edge lines than it was with the 2x2 averaging filter.  There are still some issues with the overall image quality from ldglite.  You can see the blended edge lines on the black surfaces appear darker in the blur filtered image.  I'm gonna need to gamma correct before the blur and then reverse the gamma afterwards to make those grey on black edges pop.  The mtPaint Handbook suggests I should read "ITU-R recommendation 709" and implement that.  Ok, will do.
Here's the same thing but with 8/12 bit lookup table gamma corrected blurring.

Hmm, the gamma correction seems to have had more of an impact on the transparent parts than the edge lines.  I'm not sure if I like it.  Something seems fishy here.  Look at the faded colors of the head and tail lights where they sit over the background color.  For a while I thought I might have to gamma correct the alpha channel, but then I rendered one with with a black background and realized the problem.  The transparent parts that appear over the background color are blended with the alpha channel and the background color, which makes them too white if the background is white.  You can see the same effect in the grey edge lines that border the background.  The image must be rendered on a black background for best results with a transparent png.  Yeah, that's what I was trying to remember from years ago.  You can use either -b0x2000000 to set the background to absolute black, or use -b0 to go with the very dark ldraw color number zero.
I rendered one on a black background, and also moved the lighting to head on.

Anyhow, about those transparent parts...  Transparent parts are handled quite differently by ldglite than in LDView or POVray.  I imagine the POV ray tracer takes on a hint of the translucent color whenever a ray is cast through a translucent object.  So multiple passes through the glass will add more of the glass color.  LDView probably (but I'm not positive about this) applies a hint of the translucent color for each surface of of translucent object between the viewer and the background.  So you take a hit from both the front and backside of the glass.  Ldglite simply applies one stipple mask for any amount of translucent stuff between the viewer and the background.  Zoom in on the non-downsampled ldglite images and you can see the stipple pattern.  Downsampling blends the stipple pattern into whatever happens to lurk behind it.  This makes it pretty, but you still only get one hit of glass color -- from the glass nearest to you, the viewer -- no matter how many translucent things you're looking through.  I'm actually ok with this approach even though it's less realistic, because it lets you see better what's behind the glass.  Some might even say that makes for easier to follow assembly instructions.  And it's sorta retro, like me.  See?
Here's a nice link on gamma corrected image scaling.  Fun reading.


I've quantified the difference in scale between LDView and ldglite.  Adjusting the camera angle setting from -ca0.01 to -ca0.01021 is enough to make the plate images match up with the LDView plate image.  I'm still not sure where the error creeps in, but I have my suspicions...

Size up this filtered ldglite image (with front lighting and -ca0.01021) to the others above.

Unfortunately the suspicions didn't pan out.  I currently have no idea what's different, or for that matter, which program is at fault.  I was hoping to compare both ldglite and LDView with some l3p/POV renders, but POV runs out of memory and fails on my junky old Windows laptop.  384 Megabytes sure as heck don't go as far as they once did.  Maybe there's some lower quality reduced memory settings I could use, but I'll have to read up some POV documentation to figure that out. 

In the meantime I double checked the -ca0.01021 ldglite setting with the car model instead of just the plate.  The wider camera angle worked the same magic on the car, so at least the error is consistent.  Click on these images and compare the sizes yourself.  It's a pretty good match.
This car image was produced by LDView in LPub3

This car image was produced by ldglite (with hard coded settings) in LPub3.

I probably should add a note at this point that I've done nothing to the LDView settings since I started testing, simply because I'm more interested in improving the abysmal quality of the ldglite pictures.  So I'm certain these LDView images are not even close to representative of what it does with the proper settings selected for LPub.


Update February 28 2016:

Real life stepped in and forced me to back away from this for a bit.  So when I got back to it I started up on a different tack.  Examining the LPub3D render.cpp code I can see that all of the rendering options appear to use the exact same command line camera angle setting.  But the LDView camera distance setup code has a bunch of fudge factors in it.  First it multiplies the scale by 0.775 inside the LDView::cameraDistance function, and then whenever it uses this function it multiplies again by 1700/1000.  What is that?!?  Some sort of aspect ratio adjustment, or is it really two different fudges?  The cameraDistance function is only used in render.cpp so there's absolutely no good reason to fudge it in two different spots.  It must be some kind of subterfuge because there's also a hideously complex table of ratios in the comments right before the LDView::cameraDistance function that I cannot make heads or tails of.  I'd swear it's just put there as a distraction.  But if I had to make a bet, I'd say this is where the ldglite and LDView rendering options diverge.   Perhaps we need to add tiny nudge to the final fudge factor to make it all good?

I had to know.  So I loaded all the programs on a newer Windows laptop that I've got with more memory, but with a busted fan unit.   I let it rest on an ice pack fresh from the freezer and did a POV render, just hoping to finish rendering the plate image before the CPU burned up.   The laptop fan squealed an agonizing screech of death, but POV did whatever it does without a popup error message.  Nothing appeared in the LPub3D window (possibly a setup issue that I don't know about) but I rummaged around in the ldraw/models/LPub3D directories and found the image.  Now I can compare the output image sizes of all 3 rendering options and figure out where to go next.

The ray traced plate image from l3p/POV is pretty, but I find all the shadows distracting.

I had to clip the POV output image to compare it to the others.  I also added a picture of it up higher in the blog to make it easier to compare plates in the image viewer here, but I think it shows ldglite and l3p/POV are using the same view setup.  And once again the LDView rendered plate is smaller.

I pasted the LDView red plate image over the l3p/POV image and zoomed in.

So what's the story with the fudge factors wrapped around the LDView camera distance calculations?  I suspect they might just be cruft left over from a work around developed for an earlier version of LDView that perhaps only provided the -FOV command line option instead of the -ca option used by l3p and ldglite.  Or maybe the LDView -ca option is only sorta compatible.  But the truth is I don't really know, and that scary table of ratios in the LPub3D source code comments makes me nervous.

Oddly enough, when I visited the old LPub4 source repository I saw the comment for revision 1.10 said "Adjusted LDView scale to match LDGLite". Now that sounds pretty good.  In fact, it could be just what the doctor ordered.  So I took a peek at the code and discovered the gawdawful table of ratios was apparently added in that revision, and so were the fudge factors.   But the factors were different from those present in the LPub3D code.   When I multiply the old fudge factors together I get a number very close to 1, so they used to cancel each other out. That's weird!  Why bother?   Makes me think we should maybe just try to remove them in LPub3D.

Meanwhile, I think LDrawModelViewer.cpp is the LDView code I want to examine.  There's a few things I don't understand, like why does the getHFov function calculate hfov from fov if we gave it hfov in -ca on the command line? And why do we need all that aspect ratio stuff anyhow if we only care about the horizontal FOV?  All that business with the tiled rendering makes it even harder to follow.  The complexity of this code makes me feel inadequate and uneducated.  But if I had to guess, I'd say maybe -ca doesn't work quite right in LDView when the window width is less than the height.  I bet it'd all work just fine if we told it to render on a big square surface instead of a rectangle.  An aspect ratio of 1 can't do any harm, and all the fudge factors should simply disappear.

However, I guessed wrong.  I removed both fudge factors and with the same width, height, -ca, and -cg command line arguments LDView renders the exact same scene as ldglite and l3p/POV.  That should make for an easy fix in LPub3D, just use the same cameraDistance function for everything.

And since we're making things easy, I decided to restore the -s ldglite command line option to it's original purpose.  Then I added a new -2x,2g command line option to scale the image and edge lines up by 2 and also decimate by 2 with the Gaussian blur filter for the png output file(s).  For offscreen renders it doubles the size of the viewport as well, to ensure you don't lose anything outside the frame.  That should make things easy.  If you just want to decimate, use -2g alone.  If you only want to scale up, use -2x alone.  I did it this way because someday maybe I'll add more more scale factors, or filter options, all separated by commas.


Update March 5 2016:

At this point, I believe I've got solutions to all of the reported flaws concerning rendering with ldglite in LPub3D.  So I've moved on to assimilating the new ldglite code from the LPub3D patch.  It looks like I can simply incorporate the C code from the LDrawIni sourceforge repository with a few tiny modifications to make it compatible with the LPub3D patch.  No need to pull in all of QT.  That's a relief.  I really should've done this 12 years ago when I was actively engaged in the LDrawIni discussion on lugnet.  BTW, as far as I know that's the most up to date (only existing) documentation on how to use it, so I could've jumped on it right away instead of waiting until now.

These are the changes to the LDrawIni code that I've spotted so far.

- The filenames are lowercased.  Nice.  Bumpy case is pinky abuse, like emacs.

- The ldrawini.c file adds the base Unofficial directory to the default list.  ok...

- It uses an LDSEARCHDIRS environment variable instead of LDRAWSEARCH.

- The additional LDRAWDIRSEARCH01-99 environment variables are skipped.

For a while I also thought the L3PInput.cpp code was changed to reverse the search order of the unofficial parts and primitives from the order used for official files, and from LDrawIni default order.  I couldn't imagine why you'd want to do that, and it turns out some string compares were swapped in the code, but the search order was not actually changed.  That's a relief.

I'm still unsure why the new LDSEARCHDIRS environment variable was created.  I'd think the original environment variables should've sufficed, especially if LPub3D is already making use of the built in LDrawIni support with LDView and L3P.  But after further study, I see there's more to it.  It looks like the LPub3D search strategy makes use of the LDrawIni codebase, but takes some shortcuts on the LDrawIni approach.  The directories in the new LDSEARCHDIRS environment variable are used to supplement the baseline search directories, and might possibly include their own P, Parts, and Models directories without explicitly spelling it all out like in LDrawIni.  That would make LDSEARCHDIRS more of a variant on the LDRAWSEARCH01 through LDRAWSEARCH99 settings.

I guess maybe I'll have to support both strategies?  Thats a bit more work, but I think it's still feasible. I'm still checking, but hopefully that's it.  Once I'm certain I'll add some modified LDrawIni code to the ldglite project and call it a day.


Update March 20 2016:

Heh, I haven't actually made all that much progress on the LDrawIni stuff.  I discovered the existing "documentation" no longer matches the current API in the real LDrawIni code.  Darn it!  There's plenty of comments in the code itself --it's self documenting -- but no simple cut and paste example code that I can leverage.  I got confirmation that LDSEARCHDIRS code from LPub3D is in fact a modified/simplified variant of the original LDrawIni code.  So my plan is still good.  I think I'm just simply having trouble motivating myself because there are more interesting problems to solve.

It's mostly with the linux build.  I got an email telling me that I'd broken the linux build on some of the major distros with namespace collisions in the new stuff.  So I chose some different names and did some testing on my main LMDE linux PC.  It all compiled, but some of the new stuff didn't quite work as well on linux.  So I fixed a few bugs, enabled the Alpha transparency bits, and even tried linking to both the off screen osmesa driver and windowed opengl.  That always gave me problems (10 years ago) and so I got pretty excited to see it finally work, just like it always did on Windows.  It was pretty fast too.  As a result I decided to try and compile an older libOSMesa version 7.6 for the aging puppeee linux my ancient eeepc netbook to see if I could make it work there too.  And it did work.  I hope it's like that on other linux distros.

I stashed the osmesa config settings that I used for puppeee linux here, just in case.

configure-osmesa-for-puppeee-linux.sh

Now I think I may have finally run out of fun excuses for avoiding the LDrawIni conversion.  Oh well, at least now I can experiment with it while lounging around the house with the tiny netbook.


Update March 26 2016:

Progress is slow, perhaps glacial, but things are moving.  I've started making test builds with progressively larger chunks of the ldrawini code enabled.  And I've already introduced my first hacks to the once pristine ldrawini.c file.  I had to lowercase some directory names (p, parts, and ldraw) and expose the previously static DirHasPandPARTS() function to make the basics work without having to install a painfully slow LDrawIniFileCaseCallback() function.  I refuse to go there.  The ldraw library should unpack in lowercase.  Linux users will just have to be responsible for matching mixed or upper case filenames and directories exactly if they choose to use them for any other files or directories on on case sensitive file systems.  I also added support for more sensible fallback directories under modern linux distributions.  So far things are working, but it's hard to fully test without more comprehensive documentation.  I did find some docs on the file format of the ldraw.ini file itself, mixed in with the l3p documentation, So now I've made a sample ldraw.ini file for linux to use for testing on my puppeee linux netbook.  I'll try a similar file on Windows.  Mac testing will have to wait a while.

But since things seemed to be working, I went ahead and made a small module in C to process the LDSEARCHDIR environment variable.  It simply tacks a few more search paths onto the end of the list from ldrawini.  I gave it a quick test on linux, then compiled it for Windows and substituted it for the ldglite 1.3.0 executable that was distributed with LPub3D.  I don't know for sure if LPub3D was exercising the LDSEARCHDIR code, but it was able to make instructions for the car model.  So just for fun I made another Windows ldglite with the blur filter, the black background, and the front lighting all enabled by default.  I substituted that one into LPub3D and regenerated the car instructions.  I think it ran a bit slower than the original ldglite on the ancient A30p laptop, but the resulting images were sharper.

Update April 9 2016:

I've still gotta run it myself on some less vintage hardware -- maybe something under 15 years old -- to see if there's any noticeable speed difference for more normal users.  But meanwhile I think I've tested it enough to call it a real release.  So I've updated the both the CVS and github repositories, and rolled out some release 1.3.1 executables for Windows on the ldglite homepage.  There's a normal release executable, and a special one with the -2g,2x option hardcoded for offscreen rendering so you can get the sharper looking images from ldglite with the current LPub3D release.  I've also tested this on OSX 10.4 Tiger.  So if I can remember how to make the dmg file then I should be able to roll out a new Mac release as well, although who knows if it'll run on a current Mac...

Here's a test file rendered offscreen with -2g,2x on my old PowerPC emac.

Then, just for fun, I fetched the Lpub4 sources from the ldraw-linux github repository, installed the required QT dev tools, and gave it a run.

   sudo apt-get install qt4-dev-tools libqt4-dev
   qmake -o Makefile lpub.pro
   make

The resulting shiny new linux lpub complained about a missing parts.list file when it started up, so I tweaked the mklist.c sources from ldglite, built a mklist executable, and ran it in the ldraw directory to generate the missing file.  I think the ldraw-linux repo has a scripted version of mklist, but I went with what I already know...  Anyhow, I set the lpub4 config settings to use a special ldglite executable with -2g,2x hardwired, and got this nice screenshot.


Afterwards I felt like I was on a roll, so I made a Mac dmg file and tested the install on an old macbook the kids left behind with OSX 10.5 leopard.  It worked, but the dmg file could use some compression and autorun magic.  I forgot the secret dmg tricks, so I'll have to do some reading and tweak it up.  This time I'll save the dmg assembly instructions in the CVS repository...

Next I'll try and make a patch for lpub4 to pass the magic -2g,2x args to ldglite so you can use a vanilla ldglite v1.3.1 executable instead of the special one.

And that might be all for this project because I think I'm running outta steam.

Tuesday, February 16, 2016

Snack Attack

While awaiting the imminent arrival of my new zipit gps toy I decided to try and attempt to resurrect an ancient openwrt-zipit build setup that I'd installed long ago on a usb drive.  You know, just in case I needed to work some more magic on the openwrt-zipit gpsd code patches.  It actually went much better than I expected, really, so I figured maybe I could fix up some needy abandoned packages in my spare time, instead of twiddling my fingers.  Idle hands and all that...

One such needy package was the burgerspace game.  I found some minor makefile quirks that needed fixing to get it and it's companion game library libflatzebra to build.  So I patched them up and hoped for the best.  Nope.  Apparently nobody ever noticed it required a 672x520 SDL window.  How did that ever work on the nanonote?  I believe that's where the original openwrt package came from.  Anyhow, I verified it worked just fine at 640x480, so all we needed to do was cut everything in half for the 320x240 screen on the zipit.  So that's what I did.  I chopped out half the raster lines, and half of the pixels in the lines that were left.  It worked, but you couldn't read the instructions or the score.  That's no fun.

Fortunately I remembered some old raster tricks from days gone by and did a quick search for fast color pixel averaging.  Yeah, that's the trick I had in mind.  I overloaded the SDLflip function in libflatzebra, pasted in the code, and voila!  It works.
I love the sound it makes when chef gets bonked by the sausage.

You can read the score without too much trouble, and if you squint real hard you can almost make out the rest of the text.  Now I just need to find some more 640x480 SDL games to convert, quickly before I forget...

The packages in mozzwald's openwrt-zipit repository are up to date, so you can install it on an openwrt zipit with opkg.  I also made an IZ2S build.

burgerspace-iz2s.zip


* By the way, the title of this post is indeed a nod to perhaps one of the greatest record album covers, ever.  But I'm sure you knew that already.


Listening to "The Problem" or the last two minutes or so of "The Party" always brings back a flood of memories from weekends at engineering school.  Heh.  So long, Rick.

Saturday, January 23, 2016

The Lost GPS Episode

This is an old tale, nearly lost to the shifting sands of time due to a peculiar practice in modern households known as "spring cleaning".  You might remember in an earlier episode when I confessed to a penchant for keeping notes on random scraps of paper, reserving the immense power of the computer for the final preparation, configuration, and publishing of said notes.  But my methods have a weakness.  Random scraps of paper notes strewn about bear a striking resemblance to garbage -- to the untrained eye.  And spring cleaning caught me by surprise this year, delayed as it was by a few months, thanks in no small part to the ferocious and lasting winter we'd so recently suffered through.  And so it came to pass that most of this tale now resides in a landfill somewhere, lost and forgotten.  I will however attempt to recreate the juicy bits from the #zipit IRC logs at mozzwald.com.

But first, a little background.  The humble beginnings of this sadly delinquent story first came about more than a year ago when I took a zipit on the road for a trip to Boston, intending to investigate it's utility as a travel laptop, alarm clock, and gps.  It worked quite well as an alarm clock, and well enough as a laptop, but my zipitized build of pspmaps made it truly a poor man's gps.  Emphasis on poor.  I'd already fixed up pspmaps to work with the latest google API -- now with JSON -- so I upgraded it further with some sorely missing features which you can read about here.  Then, as chance would have it, the clever folks on the zipit IRC channel got to chatting about some tiny serial gps modules.  So I did some searches and discovered the new breed of gps modules were much smaller than what I'd worked with in the past, which makes sense if you think about it.  And now you can get them packaged with the antenna built right onboard.  Nice!  Eventually I got motivated and purchased one for myself -- a tiny usb serial gps module (with built in antenna) to use in conjunction with pspmaps on the zipit.
 Here it is.  GlobalSat USB dongle Model No ND-105C.  Zipit included for size comparison.

The GlobalSat gps arrived in early May, last spring.  It's even smaller in real life than I imagined from the pictures.  And it's designed to spit out NMEA sentences once a second or so at 4800bps over usb serial, most likely to an android phone or a tablet.  But it's also exactly what I required to convince pspmaps to track the location of the zipit. So the first order of business was to get it connected it to my laptop and make sure it really worked.  The GlobalSat has a blinking red LED on one side to indicate that it has power and is getting fixes.  Red LED, check. Hold it right side up near the window and the LED blinks, check 2.  Next step, set the serial baud rate and see what's cooking.

stty -a /dev/ttyUSB0
stty -F /dev/ttyUSB0 4800
cat </dev/ttyUSB0


Yay!  NMEA sentences.  It works.  Hit Ctrl-C to make them stop.

So now we want to try it on the zipit.  You'll need an adapter to get usb out of the rear connector on the zipit.  If you can solder the tiny pins then you can make your own cable from the Hirose connector like the one shown in the picture above, or you can get a cool zipit breakout board from mozzwald while they're still available.  Once it's connected you have to load the kernel module and toggle the zipit usb  into hostmode.  If you have the latest openwrt jffs with mozzwald's zippity beep extras then you should be ok.  I borrowed the kernel and some nice scripts like /usr/local/bin/usbtog from the jffs image and loaded them on my openwrt SD card so I'd have room to build things.  Navigate to the gmenu2x terminals screen and open up a bash command prompt. 

Load the prolific usb serial module for this gps.

insmod pl2303

Toggle usb to device mode and then back to host mode.

usbtog d
usbtog h


Make sure the usb serial device was created.

ls /dev/ttyUSB*

Look around to see what's up.

lsusb

    Bus 001 Device 001: ID 1d6b:0001
    Bus 001 Device 003: ID 067b:2303


dmesg


    pxa27x-udc pxa27x-udc: USB reset
    USB Serial support registered for pl2303
    usbcore: registered new interface driver pl2303
    pl2303: Prolific PL2303 USB to serial adaptor driver
    pxa27x-udc pxa27x-udc: USB reset
    usb 1-2: new full-speed USB device number 2 using pxa27x-ohci
    usb 1-2: New USB device found, idVendor=067b, idProduct=2303
    usb 1-2: New USB device strings: Mfr=1, Product=2, SerialNumber=0
    usb 1-2: Product: USB-Serial Controller D
    usb 1-2: Manufacturer: Prolific Technology Inc.
    pl2303 1-2:1.0: pl2303 converter detected
    usb 1-2: pl2303 converter now attached to ttyUSB0


Now fetch a copy of picocom and run it to watch the NMEA messages scroll by.  If you're near a window you should be able to recognize the position fix messages.

picocom -b 4800 /dev/ttyUSB0

Press ctrl-a crtl-x to return to the console.  Once you've verified the gps actually works on the zipit you can get started installing some software to make better use of it.  Apparently gpsd is the defacto standard gps driver on linux.  It sounds really nice.  Supposedly it sets itself up between you and the raw NMEA messages and smooths over the wrinkles while making the data available to multiple multiplexed clients, even remote ones.  Cool.  You'll want to grab the specially patched version of gpsd for the zipit and install it with opkg.  Here's some additional reading on gpsd clients if you're curious.

When I'm testing things I usually open a second tty on the zipit with alt-right, load a smaller font like iz2slat and launch gpsd from there so I can see what it's doing and so I can talk to it from the original tty, accessible via alt-left.  I discovered early on that gpsd only seems to run from a real zipit tty.  Normally I ssh into the zipit to test things but that didn't work for this.  I also discovered that you must bring up the loopback adapter so you can talk to gpsd.

ifconfig lo up
gpsd -N -n -D 3 -G /dev/ttyUSB0

Now you can telnet into port 2947 on the zipit (from the zipit or your laptop) and send the command to make gpsd talk.

telnet localhost 2947
?WATCH={"enable":true,"json":true}

It should start jabbering away.  Use the IP address of your zipit instead of localhost if you want to try this from your laptop.

You can also run a special version of gpsd sample client program cgps, that I christened zgps, with all the extra whitespace squeezed out so that it fits on the tiny zipit screen.  This will print live fix information in a more human readable format than the raw JSON data you looked at earlier.  The modified zgps.c source code is available if you'd like to see what I did.
The zgps client shows you what the gps sees.

I also used another gpsd example client program gpspipe to make a nifty little speedometer script for the zipit that you can play with.  If you want to duct tape the zipit to your bicycle and still be able to actually read it while riding, then you'll need to find the nice large ter-132b.psf terminus console font somewhere, possibly in a full PC linux OS, and install it on your zipit.
The zipit is not currently moving at top speed.

And finally, the goal of this adventure, a special version of pspmaps patched to work with gpsd is available.  If you don't already have it, install pspmaps 2.4.2.  Then rename the pspmaps executable (just in case) and replace it with the gpsd patched version.  When you run it, there should now be a selection in the menu to enable the gps tracking.  The updated pspmaps source code is in my pspmaps github project.  Normally, I'd cap this part of the story off with a short shaky video of pspmaps tracking my progress along a local road somewhere.  It really did work, I swear, but unfortunately I haven't made that video yet.  Sorry.

So how did we get here?  The full story is faithfully recorded in the irclogs from early May to the middle of June.  Search for the word gps from user deeice if you want all the details.  I'll try to cover the highlights. 

When the gsp arrived, my first priority was to make sure it actually worked with the zipit.  That took some trial and error with the kernel modules and the usb host/data mode toggling business, but eventually I arrived at the recipe listed above and could see the gps talking and reporting NMEA location fixes in picocom.  The next step was gpsd.  The default openwrt-zipit package is the old and crusty version 3.6 gpsd, so I checked to see what version was in the current upstream openwrt packages.  I think that's how we settled on version 3.10.   Or maybe that was the version available on the zipit Arch linux.  I was mixing it up at the time, working on both openwrt and Arch, so who knows.  Anyhow, I got the newer gpsd compiled and running on the zipit and then got busy hacking the cgps code into a multithreaded demo that I might eventually shoehorn into pspmaps.  That took much longer than it should have because none of the gpsd client programs running on the zipit would talk to gpsd until I finally realized the loopback interface wasn't up.  Darn it!  Once I solved that issue, the rudimentary pspmaps to gpsd interface was coded up and working in no time.  And then we discovered the performance issues.

It turns out gpsd is littered with floating point math!  Ewww!  Also it does't appear to use blocking IO to read the NMEA sentences from the serial port.  Both of these issues were confirmed by scanning through the gpsd mailing list log file archives.  Apparently they've made various attempts to fix things over several releases but were not entirely successful, most likely because the zipit and other seriously underpowered devices are not in their target market.  So I set about trying to fix it because the enormous cpu drain of gpsd was clobbering the pspmaps performance. 
CPU is pegged at 80%.  Yikes!

For some reason gpsd wants to calculate its own "more accurate" location fixes from the satellite position data, using loads of floating point math, each and every time a character is received from the gps.  Or at least it might as well be.  The mailing list logs pointed to a NOFLOATS_ENABLE configure option that might alleviate some of the pain, but the option seems to have disappeared in the most recent 3.14 versions of gpsd, so libgpsd 3.10 version was selected and built with the NOFLOATS_ENABLE setting.  That made things marginally better.  Next I fixed the IO select call to block, but it still used too much cpu.  So I was forced to go with a simple hack to usleep for a fraction of a second  whenever we receive snippet of data from the gps.  That chunks the data up into larger clusters and gives the cpu some well deserved rest periods in between.  Pspmaps only looks at the fix data once a second anyhow.  That put the performance in the not great, but acceptable range.  I was looking for less than 5% cpu usage and we were getting something more like 20.

So I checked out some alternatives to gpsd.  There's an ancient version of gpsd hacked to use fixed point math for the maemo called minigpsd that looked at least slightly promising.  But further investigation showed the api was incompatible and insufficient, and even worse it made use of the enormous bloated gconf library for it's tiny config file.  WTF?  Even the gnome crowd seems to have abandoned gconf as a mistake.  I also looked at some interesting arduino code like tinygps.  But then I found what I wanted in the simple raw NMEA parser minmea.  It doesn't multiplex the gps data (as far as I know), but it does support fixed point math and my simple test program showed it only uses about 6% of the cpu (probably half of that is printing out what it's doing) so it's a winner.  According to the github pspmaps archive, I've already hooked this into the pspmaps code base along with the gpsd code, but I couldn't actually remember running any tests on pspmaps with minmea.  So I ran some tests and it really does work pretty much as I promised.  Yay.  I'm not sure how robust my code is if for example the gps is disconnected and reconnected later.  So I still need to do some follow up work here...

Also, I don't seem to have the faster gpsd installed on my zipit.  At least it doesn't act any faster than that screenshot above.  Phooey!  Gotta poke around on the zipit and see what happened to that.

I also need to tinker with using /etc/init.d to launch gpsd for better hot plugging.
And I need to locate (or make) the Arch executables for zgps and/or pspmaps.

The todo list goes on and on.  Time to find some random scraps of paper and get this down in writing...


Update January 25 2016:

Ok, I found the faster gpsd executable (with a tenth of a second usleep before the select call, and perhaps a few other unknown tweaks that I thought might work).

Significantly less cpu used by the patched gpsd.

Now I just need to figure out exactly how I created it so we can get it into a real ipk package.  Until then you can copy this one to /usr/sbin/gpsd and replace the one installed by the gpsd ipk.

gpsd-wrt-with-usleep.tgz


Update 2:

Actually, that might just be all there is to this story.  The gps was acting flaky recently, and now it won't talk at all.  I think the flimsy micro usb connector got busted somehow.  Oh well.

Update 3:

Nope.  I'm not ready to end this yet, so I ordered a cheap serial gps from sparkfun to keep the hope alive.  It's as simple as it gets for a serial gps in order to work around my limitations.  In theory, I should be able to connect the three wires (gnd, 3.3V, and tx) to the power, ground, and ttyS1 rx line on the zipit expansion port.  I already have 3 of the appropriate connectors with which to learn how to solder properly (or get someone skilled to do it).  The best part of this plan is that it should work with both iz2s and the current openwrt and arch zipit distributions.  At least, that's the plan.

Hmm, perhaps while I'm waiting for the package I'll try and use my serial to ttl converter to test that rx pin.  I know I've managed to get a clip onto one or 2 of those tiny pins in the past.

 See that?  I got 3 clips on the zipit connector for some gpio tests, way back when.


Update 4 - January 30 2016:

While waiting for the sparkfun gps to arrive, I figured I might as well check and make sure the whole expansion connector serial port idea works.  Supposedly pin 7 on the connector is labeled btrxd, and was originally intended as the receive line for a bluetooth serial port, which the kernel sees as ttyS1.  The bluetooth transmit and flow control lines are only available on pads inside the zipit and not exposed on the expansion adapter, but that's ok for my purposes.  Somebody at Zipit Wireless must've been thinking of me when they did that.  Anyhow, I compiled picocom on my iz2s zipit and created the ttyS1 serial device.

mknod /dev/ttyS1 c 4 65

Then I connected some clips to pins 7 btrxd and 22 gnd on the zipit connector and clipped the other ends to tx and gnd on a nokia ca-42 data cable that was hanging off a usb slot on my laptop.

Here's the wiring harness.  Ignore that green screw terminal dB9 adapter on the top right.

I then cranked up picocom at both ends and sent a friendly message to the zipit.

It's gonna work.


Update 5 - February 21 2016:

The axim cable arrived a while back but I was busy dog sitting and didn't do much with it for quite a while.
Little Edison probably thinks it's a chew toy, just for him.

Once there was no longer danger of interference from small doggies demanding attention, I got busy with the cable.

 Here's the axim cable with the lid removed.

It's well constructed for my plans.  The connecter is easy to disassemble with two screws and some small clips on the sides near the business end.  There's only 4 wires through the cable, but they're connected to about 13 pins.  In the picture you can can see some extra wires used to tie different blocks of pins together.  Probably all go to ground on the axim.

I've pulled a fistful of pins, all tied to the red wire.

I used my needle nose pliers to yank the blocks of pins, and then chopped off all but one pin from each wire with a toe nail clipper.  Hope it still works for my toes...  Then I re-inserted 3 of the pins back into the proper slots required to connect the gps to the zipit bluetooth serial pins.  My notes say I connected the green wire to pin 22 ground, black to pin 17 +3.3V, and white to pin 7 btrxd, reserving the red wire for "in case of emergency..."
The reassembled cable has just 3 pins, right where I want them.

The operation was something of a challenge because I only have 2 hands and can no longer see all that well up close.  Fortunately I discovered an old kids toy festooned with magnifiers and doubled up the 2 biggest lenses so I could see the pins and their slots.

Eventually the sparkfun gps arrived as well, you can see it in that last picture of the cable.  I will get it connected, but meanwhile, interest in my lego CAD programs has been rekindled briefly, so I'm going with that for now.


Update 6 - September 24 2016:

I did eventually return to this topic and finish the job.  You can read the final chapter in the zipit gps saga here.

Saturday, January 2, 2016

Space Quest

The quest for space continues.  No, not the game -- although that might be a good excuse to compile ScummVM, since I never completed the mission in Space Quest 3.  But no, we're talking about my personal quest for free disk space here.  The goodie bag hasn't been updated in over a year, and my temporary datafilehost.com links were all fading away from lack of exercise.  A remedy for the situation was clearly long overdue.

I tried dropbox, and it works.  I fixed up the expired datafilehost links by moving them to dropbox, but the dropbox interface doesn't suit my style. Meanwhile mozzwald generously donated a directory on his server.  So I recreated the goodie bag there and started making updates for the more recent blog posts.

While this was happening, I also went off on a quest of sorts for free disk space in the openwrt jffs.  When you install the openwrt jffs from flashstock, the first thing you probably notice is the jffs performing poorly due to the lack of free erase blocks.  It's packed to the gills with good stuff, but there's no room to breathe.  Most of us end up deleting some big files (like streamripper) and moving them to an SD card instead, just to make it behave.  However there's actually plenty of wasted space on the flash, and I so finally decided to try and take some of it for the jffs.

Mozzwald's version of the openwrt rc23 jffs (with streamripper already gone)

My first target was the UBOOT Splash Image partition.  I don't know anyone who'd rather stare at a static image than the informative boot messages.  I want to see what's going on (or more often than I'd like, what's going wrong) when the thing is starting up.  Given a choice, I'm never gonna hide the boot messages behind a pretty picture of a penguin or somesuch nonsense.  So, for me the stupid empty splash partition was a total waste of 128K bytes of precious flash that by all rights should've belonged to the jffs.  That right there is just enough erase blocks to uncramp the jffs and allow a decent amount of customization.

Because the image partition is empty and contiguous with the end of the jffs, this turned out to be some low hanging fruit.  The kernel will automatically format the extra space as jffs when it boots.  Here are the steps to merge the uboot image partition with jffs.  Power up the zipit and quickly press a key to pause inside uboot at the uboot command prompt.  Then update the uboot environment to include a modified mtdparts setting in the bootargs environment variable.

printenv

setenv bootargs "console=ttyS2,115200 fbcon=rotate:3 root=/dev/mtdblock3 rw rootfstype=jffs2 mtdparts=physmap-flash:256k(uboot),128k(ubootenv),1152k(kernel),-(filesystem)"

saveenv
boot
Once openwrt is up and running, open up bash and confirm the new partition scheme, and the extra space in the jffs.

cat /proc/mtd
df -h

Enjoy the additional headroom.


Mozzwald's version of the openwrt rc23 jffs (with 128K recovered from bootsplash)

Now, at this point I got greedy.  Riding the high of easy victory I decided to go for the gold.  For the last three years I've been waffling over an existing uboot hack https://github.com/stratumnine/u-boot-pxa-zipit-env8k that carves out another 192K of flash from the uboot and uboot environment partitions. So I booted up the zipit with openwrt from the SD card and started making preparations.  First I fetched some tools for uboot.

opkg update
opkg install uboot-envutils

This only installs the fw_printenv binary so you have do do some legwork.

cd /etc
echo "/dev/mtd1 0x0000 0x20000 0x10000 2" >fw_env.config
cd /usr/sbin
ln -s fw_printenv fw_setenv

I decided to test the tools by stashing the MAC address of the zipit in the uboot environment.

fw_printenv
fw_setenv ethaddr xx:xx:xx:xx:xx:xx
strings /dev/mtdblock1 |grep ethaddr

I'm planning to use that bit with strings to (someday) make the MAC address match the zipit when I boot from an SD card.  It should work with both openwrt and arch SD cards.

Next I got the tools to tinker with the /boot/uboot.script uboot environment files we use when booting from the SD card.

wget http://mozzwald.com/zipit/uboot/z2uflasher_03222011.tar.bz2

Unzip it and copy mkscript.sh and mkimage.arm.static to openwrt sd card.  I used these to add mtdparts to the bootargs in /boot/uboot.script on the SD card and then rebooted the zipit from the SD card.  The kernel gave me an error because of spaces in the partition names, so I tried again without the spaces and it worked.  Now the mtd partitions when booting from SD matched the ones I got when booting from flash.  This meant I could relocate partitions when booting from SD.  So I thought I was ready.

I fetched the env8k-uboot.bin from stratumnine and examined it.  I verified the first instruction ea000ffe really does branch to 0x4000 in ARM asm.  The small 8k uboot environment is completely empty, which should be ok.  The rest of the file looks like code so I decided to go for broke.  Unfortunately I got impatient and rushed it.  I wrote to the character mtd device instead of the block mtd device and bricked the zipit.  Darn it!   Probably should've used the mtd program instead of dd, or maybe some of the other standalone mtd-utils (which are apparently packaged individually by openwrt), or simply modified the flashstock script which is already known to work.

 
Perhaps it's time for daddy to learn how to solder...

Update Jan 9, 2016:

Turns out the env8k-uboot.bin has a bug that renders it useless anyhow.  It's able to save changes to the uboot environment in the 8k sector, but it does't read the saved environment on boot.  So we can't add an mtdparts setting to the bootargs.  Also, the code on github doesn't have all of the changes required to make the 8kenv-uboot.bin file.  Additionally the uboot partition in this setup starts with six 8k blocks and ends with two 64k blocks, which appears to render the /dev/mtdblock2 device unwritable because there's no one size fits all erase block.  That's a nuisance, but not a deal breaker.  However, unless we find the code and fix it, the 8kenv-uboot is a dead end.

Not one to give up so easily, I retrieved from my archives a slightly older tiny uboot setup from stratumnine with a more conventional layout that's only 64k bigger than the 8kenv-uboot.  I modified my flashstock SD card by creating a new flashdump directory combining the tiny uboot with the kernel and filesystem from mozzwalds zipity-beeps flashdump directory.  Here's what's in the modified flash.def file.

u-boot-z2-tiny.bin 0 bae3dc47a78032e8c98990767743aaba
mtdblock2.bak 262144 374666a92397653c2dd5119b3270b2e2
mtdblock3.bak 1441792 26f82b88f912d44f6db1388141ad4fb4


I then booted the zipit from the updated flashstock SD card, selected my new option from the list, crossed my fingers and let it flash.  This time uboot started up just fine.  Yay!  So I quickly hit the enter key to interrupt it and fix up the environment.


printenv

setenv bootargs "console=tty0 console=ttyS2,115200 fbcon=rotate:3 root=/dev/mtdblock3 rw rootfstype=jffs2 mtdparts=physmap-flash:192k(uboot),64k(ubootenv),1152k(kernel),-(filesystem)"

saveenv
boot


Check it out!  500K free in the jffs.  Let's examine the partitions.

cat /proc/mtd
dev:    size   erasesize  name
mtd0: 00030000 00010000 "uboot"
mtd1: 00010000 00010000 "ubootenv"
mtd2: 00120000 00010000 "kernel"
mtd3: 006a0000 00010000 "filesystem"


Next I saved the uboot environment and added it to the tinyuboot flashdump to make this all simple and automated.  But first I removed console=/dev/tty0 from bootargs.  That gets a bit annoying when it prints kernel messages all over your bash session.  Here's the final result.

tinyuboot-flashdump.zip

Unzip it onto your flashstock SD card if you want to try it.  It'll give you an additional menu choice of tinyuboot to write to flash.

In the flashstock menu.  More options to choose from.

I'm still undecided which way to go on the kernel messages so I included two backups of the uboot environment partition in the tinyuboot directory -- one with kernel logging to tty0, and one that only logs to ttyS2.  It's currently setup to use the the one that's quiet on tty0 because the openwrt busybox on the jffs backup lacks the setlogcons applet to change that at runtime.  But I don't really like the lack of screen updates during boot.  Makes me nervous.  So I might try just turning the log messages off in the openwrt init system file /etc/config/system.

config 'system'
    option 'hostname'    'engine12'

    option 'conloglevel'    1

So hard to decide...


Tuesday, October 6, 2015

Marking Time

I was about to call this post "Adventures in Failure", but then I remembered that I already used that title.  Oh well, at least I finally have something to write about again, even if it is mostly fail.

The summer of code started out on the right track.  I decided to take pspmaps to the next level, and bought a tiny inexpensive usb gps to attach to the zipit.  I made some great progress and someday I'll write all about it here, but not right now because I didn't quite finish anything to my satisfaction.  Before I got there, I inherited a beat up crate of old school vinyl records from the turn of the 70s that otherwise would've landed in a dumpster somewhere.  I couldn't let that happen, so I spent most of my free time over the summer converting the vinyl to mp3s for the zipit in the car, instead of polishing up the gps code.  By the time I finished I'd lost my thread, misplaced my notes, and forgotten my passwords to both github and the scratchbox virtual machine I used for zipit development.   Getting old and forgetful can be a real bummer sometimes.

Eventually the passwords came back, but I could not get any traction with the gps coding. My lack of progress was duly noted on the zipit IRC channel, and it was suggested that I should try to do something really dead simple to get back in the groove.  Perhaps due to the sad state of my notes -- a jumbled mess of post-its and random scraps of paper -- the ctodo program was put forward as an award winning solution to this particular problem.  One that could possibly fill a small gap in the productivity apps available on the zipit.  So I gave it a quick compile on my laptop, but it segfaulted on my first key press.  Award winning gold smiley program indeed...

I fixed that particular segfault, submitted a pull request from my fork of the project on github, and to my total astonishment the change was accepted and merged into the main upstream branch no more than a minute later.  I really gotta learn me some organization  skills like that ctodo author.  Could running ctodo on the zipit could do that for me?  Nope.  It works on the laptop, but locks up the zipit.  Maybe it's the screen size.  I don't know.  I give up.  I can already do the same thing on the zipit with emacs if i were so inclined.  I just happen to prefer scraps of paper and dusty piles of sticky notes.

Someone else on IRC suggested that noisy apps are fun on the zipit, and could I maybe finish porting the little piggy tracker that I'd abandoned unfinished many months ago.  Sure, why not?  I eventually figured out where I'd left my work on that project.  What is it that makes some people (mostly object oriented C++ zealots and Apple computer users) name things like directories and source code files with a leading capital letter?  It took nearly 3 weeks before I thought to search for a directory starting with a capital L.  Oh, look, there it is!

Anyhow, when I previously abandoned lgpt I'd gotten it running, but the screen was completely black.  This time I tried it first with an official build on the laptop and worked out the key sequence to quit -- right, right, A -- and then typed the same sequence on the zipit.  Voila, it exited the program gracefully.  Once I had that down, I located the logging function and instrumented just about everything that could possibly alter a pixel on the screen with debug messages.  I found and fixed a few small coding oversights and eventually got the display working.  I suspect the particular lgpt display code option I selected for my zipit build (generic SDL on the framebuffer) was written long ago, but never tested.  Perhaps only the  windowed (non-framebuffer) SDL code, and display code tailored for particular gaming devices, was ok.  There were no guidelines other than the source code itself to help me out, so this was much harder than it really should've been.  And to bump up the frustration level, once I got it displaying things and making sounds, I quickly discovered that it eventually crashes at random times when I try to use it on the zipit.  I give up.  Again.

After all this I was getting pretty desperate for something -- anything -- that I could call a success, so I set my sights a bit lower.  Ok, a lot lower...  I still like noise makers so I dug up a 12 year old drum program, the drumpiler which reads ASCII formated rhythms and pushes the expected sounds out through the speaker.  Now that's something maybe I can understand.  Write yourself a rhythm in emacs and then run it through a compiler.


I tried it first on the laptop and attempted to use the example rhythm from the documentation along with the 4 wav file sounds from the drumtoy program.  Didn't work.  Apparently it's very picky about what sort of wav files you can feed it.  The code is quite dense and very lightly commented in what I suspect is Italian, but after some intense gdb sessions and internet searches for wav file header layout info, I created a one line hack to make it accept mono sound files in addition to the stereo files it originally wanted.  It actually sounds pretty good on the zipit with the drumtoy samples.  Wooot!  Success at last!  I'm back in business.

The goodies will be posted right here, just as soon as I've created a satisfying rhythm I can call my own.  Or maybe sooner, when I come to the realization that I actually have no musical talent to speak of.


Update:  Yep, it's confirmed.  I have no musical talent.  I tried to whip up a simple GoGo beat, but it was so totally wrong that I had to rename the file to nogo.txt  It's included in the iz2s package for your enjoyment.

drumpiler-0.9.1-iz2s.zip

Listen and laugh.


Update 2: I decided to keep going with the command line noisemaker thing for a little while longer, so I made an openwrt build of the drumpiler.

drumpiler-0.9.1-wrt.tgz

I also decided to investigate the similar jdkdrum program that should be available for openwrt from the openwrt-zipit package, but for some unknown reason the package failed to build.  This one lays out the drum tracks horizontally instead of vertically, if that's more your style.   I built it first for iz2s and it was somewhat sluggish starting up, but then it ran just fine once it started making noise.  There's a bunch of floating point math involved in mixing the tracks before it plays, so I converted it to fixed point and now it's quite snappy on iz2s.    I used the compiler on the zipit itself to build it for openwrt.  That took less than a minute and went without a hitch, so I don't know what's wrong with the official package.   Also, the original source worked ok with very little start up delay, most likely due to the superior eabi floating point implementation in the openwrt distribution.   Here's the goodies.

jdkdrum-iz2s.zip

jdkdrum-wrt.tgz

And here's the jdkdrum fixed point patch.

I'm currently thinking about shifting away from the command line (but sticking with the console) to investigate the pineapple tracker, or one of several other forks of hardware chiptune tracker project code that you can find kicking around on github.  I think it might be fun to get another ncurses style tracker running on the zipit, if I can squeeze it onto the tiny screen.


Update 3:  I built both trackers (compiled and debugged them on the zipit itself) and they both appear to work ok.  Pineapple tracker is quite a cpu hog, however I haven't yet tracked down the reason why.  That's because the hyperbola tracker is small enough to fit easily on the internal zipit jffs.  And with a few small code tweaks, it fits on the zipit screen with the 5x8 font.  It's also very light on the cpu.

Debugging an ncurses application on the zipit with gdbtui was fun, but challenging.   Even with an ssh session I kept hosing up the screen.  If only I'd noticed this tip about the gdb tty command before I got things working.  That lets me run gdb in a nice large ssh window on the laptop while ncurses operates on the zipit console.  Perfect.  I should probably debug a few more ncurses apps before I forget this handy trick.


Pictures and new goodies will be posted real soon now.

lgpt-iz2s.zip
hyperbola-iz2s.tgz
pineapple-iz2s.tgz


Update 4 (January 2016):

I Compiled some trackers for openwrt.  Still gotta work on the pictures...

hyperbola-wrt.tgz
pineapple-wrt.tgz

These require an OSS compatible libSDL (otherwise they sound like garbage).

libSDL-1.2.so.0.11.3-wrt-alsa-oss.tgz
or
libSDL-1.2.so.0.11.3-wrt-alsa-oss-sticky.tgz

Unfortunately these libSDLs cause the gmu supplied on the jffs to segfault, so use with caution.  The older gmu (version 8) that I have on my SD card works ok though.  Investigation is ongoing...  I think maybe it's something to do with the sdl timer code used in gmu9.  I don't have a working autotools on my openwrt zipit, so I had to use the iz2s config.h file.

Meanwhile slug_ over at engine12.com, who still has a real working openwrt zipit dev setup (mine died in a disk crash), applied the sticky key patch, enabled oss, and made a real openwrt package.  So this one actually works, and as an added bonus the official openwrt gcc is newer and better, so the resulting lib is smaller -- only 4k or so larger than the old one that comes with with the openwrt jffs.

libsdl_1.2.14-2_pxa.ipk